Data Set Templates
Table of content:
- What are Data Set Templates?
- Starting Your First Template-Based Data Flow
- Exploring the Template Gallery
- Connecting Your Sources
- Understanding Your Data Sets
- Setting Up Your Destination
- Completing Your Setup
- Quick Tips for Success
1. What are Data Set Templates?
Data Set Templates are pre-built data flow configurations that help you quickly set up data imports and transformations without starting from scratch. Think of them as ready-made recipes for common data tasks.
Templates vs. Building from Scratch
When you create a new data flow in Coupler.io, you have two options:
- Using a template: You start with a proven setup that includes pre-configured data sources, data sets, and common metrics. Connect your accounts and customize the details as needed.
- Building from scratch: You manually configure every step: choosing sources, setting up data, and defining outputs yourself.
Why Use Templates?
Templates are especially helpful if you're new to Coupler.io or data workflows because they:
- Save time – No need to figure out complex configurations.
- Reduce errors – Pre-tested setups that work reliably.
- Provide guidance – Show you best practices for common data tasks.
- Include useful data sets – Come with relevant calculations and data views already set up.
Who Should Use Templates?
Templates work well for:
- First-time Coupler.io users.
- Anyone setting up common data workflows (marketing reports, sales analytics, etc.).
- Users who want to get results quickly without learning complex configurations.
- Teams looking for standardized data processes.
You can always customize templates after setup or switch to building from scratch once you're more comfortable with the platform.
2. Starting Your First Template-Based Data Flow
Creating a data flow with templates is straightforward.
Here's how to get started:
Step 1: Create a New Data Flow
Navigate to your data flows section and click "Create".

Step 2: Choose Your Starting Point
You'll see a New data flow screen that asks "How do you want to start?"
This screen includes:
- Data flow name field – Give your data flow a descriptive name.
- Two main options:
- Use prebuilt data set – Start with a data set template.
- Set up from scratch – Build your own custom setup.
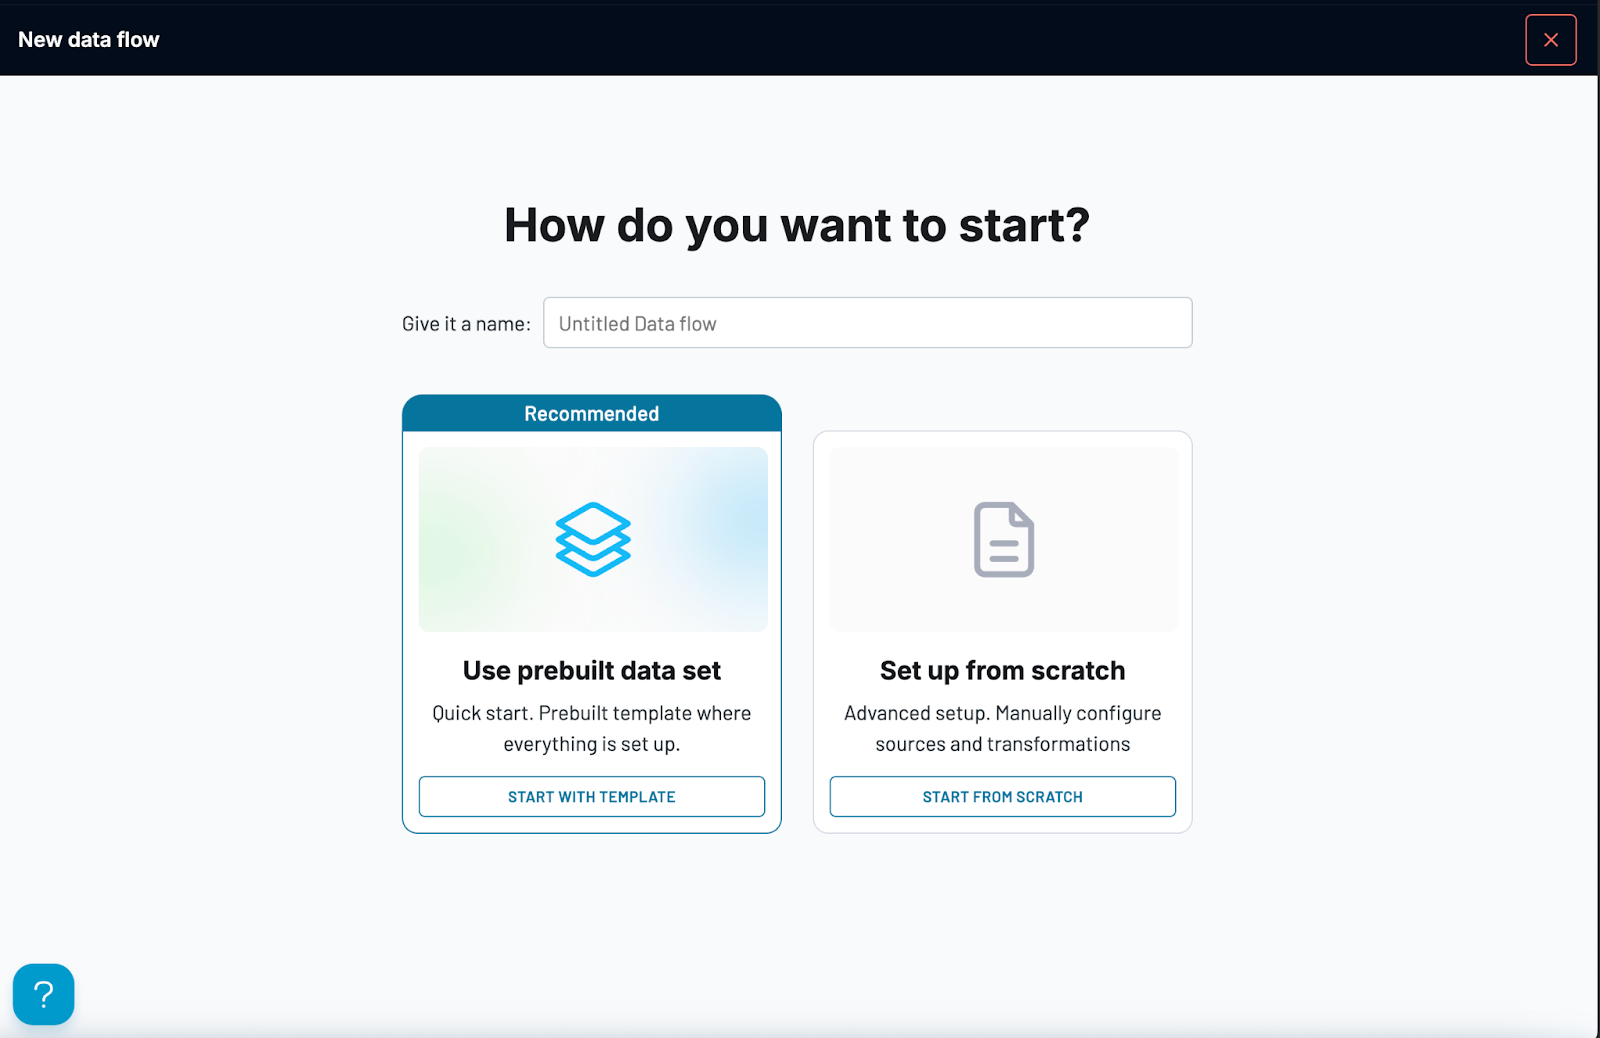
Step 3: Select "Use prebuilt data set"
Click on the template option to proceed with the template-based approach. This will take you directly to the template gallery where you can browse and select from available templates.
3. Exploring the Template Gallery
Once you choose to use a Data Set Template, you'll enter the template gallery where you can browse available options and see detailed previews before making your selection.
What You'll See in the Gallery
The template gallery is split into two main areas:
Left sidebar – Template list:
- Template names with descriptive titles like "PPC campaign performance" or "Multi-channel creatives performance".
- Brief descriptions under each name explain what the template does.
-
Currently selected template is highlighted (in this case, the first one is auto-selected).


Top section – Search and filters:
- Search bar.
- Sources dropdown to filter by specific data sources.
- Categories dropdown to filter by template category (marketing, sales, etc.).

Right side – Template preview:
- Template name and full description – Shows exactly what data analysis the selected template performs.
- Source icons – Visual display of all platforms from which this template can pull data.
- Key metrics – Labels showing the main metrics you will be able to analyze after setting up this template.
- Interactive data preview – A live view of what your final data table will look like, complete with column headers and sample data. We encourage you to go through this interactive preview to get to know the data structure.

Bottom action buttons:
- "START FROM SCRATCH" – Option to abandon templates and build manually.
- "USE SELECTED TEMPLATE" – Proceed with the currently previewed template.

Browsing and Finding Templates
Start exploring: The first template is automatically selected when you open the gallery, providing an immediate preview for your examination.
Browse other options: Click any template name in the left sidebar to instantly update the preview panel with that template's details.
Search for specifics: Use the search bar to find templates by typing platform names, metrics, or analysis types you need.
Apply filters: Use the Sources dropdown to show only templates for platforms you use, or the Categories dropdown to focus on your industry.
Understanding the Preview
Read the full description: This explains exactly what analysis the template performs and what insights you'll gain.
Check platform compatibility: The source icons indicate which platforms the template can connect to – ensure yours are included.
Review key metrics: The metrics show what data points you'll get in your final output.
Examine the data structure: The sample table preview shows how your data will be organized, with actual column headers and data layout.
Pay attention to guided tooltips: The blue overlay boxes explain the template's value and what you can discover with it.
Making Your Selection
After exploring your options:
- Found the right template? Click "USE SELECTED TEMPLATE" to proceed with setup
- Need something different? Continue browsing by clicking on other templates in the sidebar
- Templates don't fit your needs? Click "START FROM SCRATCH" to build a custom configuration
The preview ensures you understand exactly what each data set template delivers, so you can confidently choose the one that matches your data analysis goals.
If You Can't Find What You Need
Don't see a template that fits your specific use case? You can either click "START FROM SCRATCH" to build your own configuration, or look for a "Request custom template" option to submit a request for a new template.

4. Connecting Your Sources
Remember that you should only connect sources that you use.
Each source has its own set of settings. All of them are covered in separate connection guides.
Please refer to them if you encounter any issues or reach out to our support.
5. Understanding Your Data Sets
There’s no need to connect all sources within the multi-source template.
After connecting your data sources, you'll reach the Data set step. This is where you can see and organize the different data views your template provides.
What are Data sets?
Think of Data sets as different ways to view and organize your data. Each transformation takes your raw data and presents it in a specific format, like a report focused on campaign performance, a breakdown by demographics, or a summary by period.
Templates come with pre-built data set that are commonly used for that type of analysis, so you don't need to create them yourself.
Pinned Data Set: Your Key Data Views
Templates use a feature called "pinned data set" to highlight the most important data views.
What pinned data sets are:
- The main data outputs that the template is designed to deliver
- Data sets marked with a pin icon
- The data views you'll most likely want to export or work with
Why they matter:
- They represent the "end product" of your template – the key insights or reports
- They're prioritized in the interface so you can find them easily
- They help you understand what the template is designed to accomplish
How to Identify Pinned Data sets
In the Data sets step, you'll see your transformations organized into two groups:
Pinned section:
- Contains data set marked with a pin icon
- These appear at the top of the list
- Represent the template's primary data outputs
Other section:
- Contains supporting transformations and raw data from the sources
- These provide additional data views or intermediate processing steps
- Still useful, but not the main focus of the template

Working with Data sets
Viewing pinned data sets: These are always visible at the top, even when scrolling through a long list of data sets.
Adding new data sets: If you add your own data set later, they'll appear in the "Other" section unless you specifically pin them.
You don't need to understand every data set in detail – the template has already organized them to highlight what matters most.
6. Setting Up Your Destination
After configuring your data set, you'll choose where your processed data should be sent. You can select from the 10+ data destinations like spreadsheets, databases, or visualization tools.

Understanding "Data Set to Share"
Once you’ve selected the destination, you need to choose the dataset to share. The destination step focuses on one key question: which data set should be exported to your destination?
Why this matters: Since templates can include multiple data sets, you need to specify which data view should be sent to your destination (like Google Sheets).

Destination Platform Setup
Templates typically default to Google Sheets as the destination, but you can choose other options based on your needs.
Each destination platform (Google Sheets, BigQuery, etc.) has its own specific configuration steps. Consult the dedicated destination guides in our help center for step-by-step instructions on:
- Connecting your destination account.
- Setting up spreadsheets or databases.
- Configuring data formatting options.
- Managing permissions and sharing settings.
7. Completing Your Setup
You're almost there! After configuring your data sources, data sets, and destination, it's time to finalize your template-based data flow.
Final Review
Before completing your setup, take a moment to review:
Data flow name: Make sure your data flow has a descriptive name that helps you identify it later.
Connected sources: Verify that all required data sources are properly connected and configured.
Selected data sets: Confirm that the right "Data set to share" is selected for your destination.
Destination settings: Ensure your destination (like Google Sheets) is configured correctly.
Running Your First Data Import
Once everything is configured:
Save and run: Complete the setup wizard to save your data flow configuration.

First import: Your data flow will begin pulling data from your connected sources and applying all the pre-built data set.
Processing time: Depending on your data volume and sources, this initial import may take some time to complete. Coupler.io will inform you about the progress in the dedicated flow settings section.

What Happens Next
Data appears in destination: Your processed data will appear in your chosen destination platform (Google Sheets, etc.), formatted according to the template's design once the run is successfully completed.
Automatic updates: If you've configured a schedule, your data will refresh automatically based on your settings.
Ready to use: The data is now ready for analysis, reporting, or sharing with your team.
Immediate Next Steps
Check your results: Review the data in your destination to ensure it is accurate and includes the expected information.
Set up scheduling: If you haven't already, consider setting up automatic data refresh to keep your reports current. (See our scheduling guides for details.)
Explore your data: Take a moment to familiarize yourself with the various columns and metrics the template offers.
Share with your team: If relevant, share access to your destination with colleagues who need the data.
If Something Doesn't Look Right
Review source connections: Check that all your data sources are properly connected and have the correct permissions.
Check template selection: Confirm you chose the right template for your use case.
Contact Support: If you're still experiencing issues, please reach out to our support team for assistance.
Your template-based data flow is now complete and ready to provide ongoing data insights with minimal maintenance required.
8. Quick Tips for Success
Now that you've completed your first template-based data flow, here are some practical tips to help you get the most out of Data Set Templates.
Best Practices for Beginners
Embrace multi-source templates: Don't be intimidated by templates that combine multiple data sources – this is where templates really shine. They handle the complex data blending for you so that you can get unified insights from platforms like Google Ads + Facebook Ads without the technical complexity.
Trust the defaults: Templates are designed with sensible defaults. Unless you have a specific reason to change settings, stick with the template's recommendations.
Name your data flows clearly: Use descriptive names like "Monthly PPC Performance - Q2 2025" instead of generic names like "Copy of Multi-channel creatives performance" or “Template”.
Check your data regularly: After your first few runs, review the output to make sure it matches your expectations and includes the data you need.
Common Questions
"Can I modify a template after setup?"
Yes, you can edit data sets, add new ones, or change destinations. The template just gives you a starting point. However, keep in mind that you might need to change the data set to share if you’d like to export the data from the new transformation you’ve created.
"What if I need data from a platform not included in the template?"
You can add additional sources to most templates or consider building a custom data flow from scratch.
"Can I use the same template multiple times?"
Absolutely. Create separate data flows for different accounts, periods, or projects using the same template.
"What if I outgrow the template?"
Templates are great starting points. As you get more comfortable, you can customize extensively or build new flows from scratch.
Next Steps After Your First Template
Set up scheduling: Configure automatic data refresh to keep your reports current without manual intervention.
Explore other templates: Try different templates to see what other insights you can gain from your data.
Learn about data sets: Once comfortable with templates, explore adding custom data set to extend their functionality.
Share your success: Show your team what you've accomplished – this often leads to identifying other data needs where templates can help.
When to Consider Building from Scratch
Templates are powerful, but they're not always the perfect fit. Consider building from scratch when:
- No existing template matches your specific use case.
- You need highly customized data processing.
- You're comfortable with Coupler.io and want full control.
- You're building something completely unique.
Getting Help
Need a custom template? Use the "Request custom template" feature to suggest new templates for common use cases.
Want to learn more? Explore our help center for advanced topics like custom data set, complex joins, and automation.
Stuck? Contact our support team – we're here to help you succeed with your data workflows.
Data set templates are designed to make data analysis accessible to everyone. With these tips and your first successful setup, you're well on your way to becoming proficient with Coupler.io's data set capabilities.