WooCommerce data source
Learn how to set up a WooCommerce data source and then move its data to one of the data destinations supported by Coupler.io
2 steps to complete the setup
1. Set up your data source
1.1. Select an application: WooCommerce

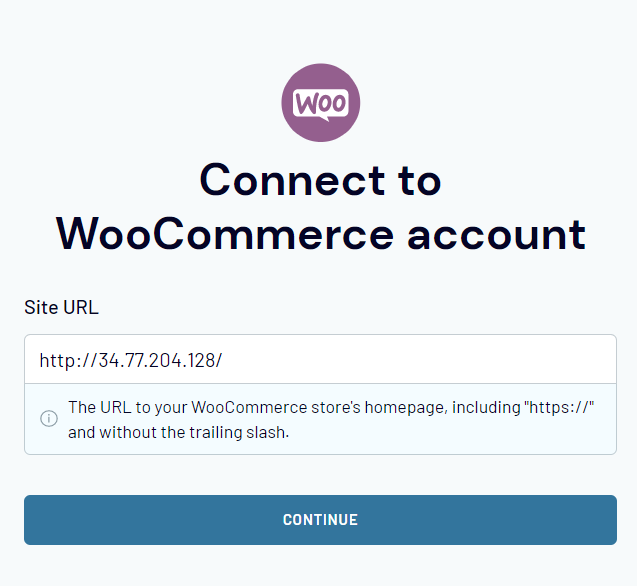
1.2. Connect your WooCommerce account
- Click "Connect".

- Enter the URL of your WooCommerce instance:
- Login to your Admin panel:

- Approve access needed for Coupler.io to fetch data via API from your WooCommerce account:


1.3. Select the data entity you want to fetch
Select a data category to import: Products, Orders, Coupons, Sales report, etc.  Type in name of the data you want to import from Salesforce and then select a needed entity from a dropdown.
1.4. Specify the optional filters
1.4.1 Data entities that support filter by a search string, before and after dates, and by order status.
- Orders
- Orders with line items


1.4.2 Data entities that support filter by a search string, before and after dates.
- Products
- Coupons
- Product reviews


1.4.3 Data entities that support filter by search string only.
- Customers
- Product categories
- Product shipping classes
- Product tags


1.4.4 Data entities that support no filters
- Product attributes
- Tax Rates
- Tax Classes
- Shipping zones
- Continents
- Countries
- Currencies
1.4.5 Reports
"Sales report" and "Top seller report" require a selected period:
- Today - is the default value
- This week
- This month
- Last month
- This year

- Custom. Requires defining of Start date and End date in YYYY-MM-DD format or macro. To learn more about using macros in Coupler.io, refer to this article.


1.5. Specify Columns to fetch
Specify the names of the columns and their order by entering each of them in a new line:

If you leave the Columns field empty - all available columns will be fetched.
2. Set up your data destination
Continue setting up the integration depending on the system you want to import data to. Select your tool from the list of supported data destinations and follow the relevant setup guide.